How to Plant a Bare Root Tree
Planting a bare-root tree or shrub is easy! There are just a few tricks you should know. These instructions should help. If you have any questions, stop by the nursery or give us a call!
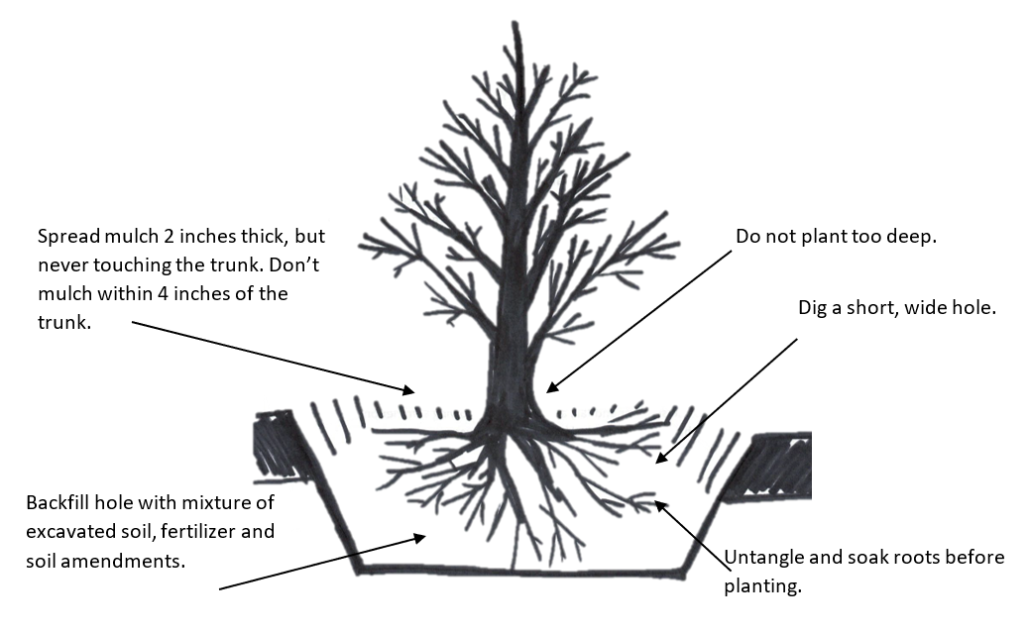
- Unpack your plant. Remove it from the bag, and loosen or remove any tightly-wound tags or stem tapes. Carefully untangle the roots. Trim off any broken roots or branches. If the roots have dried out, soak them in plain, air-temperature water for 15 minutes to 3 hours. Do not soak for more than 4 hours. If you cannot plant your bare root tree right away, put it outside and cover the roots with moist sawdust or mulch. Try not to store your tree this way for longer than several days. Planting immediately after purchasing is ideal!
- Dig a short, wide hole, about 2′-3′ deep and wide. It should be wide enough that the roots can grow outward without crowding. If you find you dug the hole too deep, put some soil back in and firm it down with your foot to prevent settling.
- Using the excavated field soil, make a mound in the center of the hole, gently firming the soil as you create the mound to avoid settling. Place your plant atop the mound, spreading the roots out evenly down the sides of the mound. Take care that you are not planting too deeply; the crown should be above the soil. It is better to plant too high than too low.
- Sprinkle a mycorrhizae inoculant over the bare roots.
- Lightly amend the backfill soil with rich compost and a very light application of an organic starter fertilizer. Shovel the mixed soil into the hole, gently tamping it down as you go. It should be firmly but not tightly packed. Water generously to help settle the soil around the roots and into the hole. If you notice that your plant is sinking as the soil settles, it is VERY important to gently wiggle and lift your plant, or start over again and replant. Being planted too deeply can suffocate the root system and is the leading cause of tree death. It is better to plant too high than too low.
- After the water has soaked in, spread a protective mulch 2-3 inches deep in a 3-foot diameter area around the base. Leave a 4-inch circle around the base of the plant, so the mulch never touches the trunk. We recommend our Soil Building Conditioner as a mulch.
- If needed, stake your tree. Use 3 stakes, evenly spaced around the tree. Tie loosely enough so that the tree can move a bit, but tightly enough that it will not tip over. Trees need trunk movement to become strong and straight and self-supporting. Mark your calendar to remove the stakes after a season of growth.
- Protect from rabbits and rodents. Make a 2′ – 3′ tall “tube” of galvanized hardware cloth or 1″ chicken wire to encircle the trunk. It should fit closely, but allowing an inch or so of room between the trunk and the barrier.
- Protect from deer. You can make a “cage” around the tree by wrapping a length of field fence in a circle. Or use the stakes as a framework, and wind wire or fishing line around them. Take care that no wire or plastic is touching or wrapped around the trunk of the tree. Even trees that are “deer resistant” can be subject to rutting, and newly planted trees and shrubs can be knocked down by deer. It is never a bad idea to keep newly planted plants well-sprayed with deer & rodent repellant sprays – it can help to make a bad first impression!
- Throughout the growing season, give your new tree plenty of water. Deep watering is recommended to help the tree develop a deep root system. Leave the hose on a trickle for 1-3 hours to make sure that water is soaking the entire root zone. It can be helpful to set a reminder alarm on your cell phone! The goal is to keep the soil moist but not soggy and to allow the soil to drain well between waterings. Deeply rooted trees are more drought-resistant in the long term. In the first season, a tree-gator bag can help make watering newly-planted trees a bit easier. If you have a spray irrigation system, DO NOT rely on it to provide adequate, deep watering. In the first 2 – 3 years you will need to supplement to make sure water is getting down deep enough.
Here’s a video with Tobey Nelson showing us the process!